Are you a diecast car enthusiast looking to showcase your collection in style? Building your own diecast car display case is a rewarding DIY project that allows you to protect your prized vehicles while also creating a stunning visual centerpiece. This comprehensive guide will walk you through every step, from planning and material selection to the final display of your meticulously curated collection. Get ready to transform your diecast car collection into a captivating display!
Planning Your Diecast Car Display Case
Before you start building, careful planning is essential. Consider the space where the display case will be placed, the number of cars you want to showcase, and the overall aesthetic you desire. Think about the dimensions that will best fit your space and collection. A well-planned display case will not only protect your cars but also enhance the visual appeal of your collection. Take some time to sketch out your design and plan your approach. The goal is to create something that is both functional and visually appealing. This initial planning phase is the cornerstone of a successful project, so be thorough and thoughtful about your design.
Choosing the Right Size and Style
The size and style of your diecast car display case will depend on several factors, including the size of your collection, the available space, and your personal preferences. Consider whether you want a wall-mounted case, a tabletop case, or a freestanding unit. Each style offers unique advantages and disadvantages regarding space utilization and visibility. Think about the layout that would best suit the room where the case will be placed and choose a style that blends in nicely. Selecting the right dimensions will ensure you make the most of the available space and keep your display uncluttered and visually appealing.
Consider the Number of Cars
The number of diecast cars you want to display is a primary factor in determining the size of your case. Measure the dimensions of your largest cars to ensure enough shelf space. Calculate the total space needed for your entire collection, allowing for some extra space if your collection is likely to grow. Proper planning prevents the display case from becoming overcrowded. When estimating space, it’s best to anticipate expansion, ensuring your case can accommodate future additions to your collection.
Select the Display Style
There are various display case styles to consider. Wall-mounted cases save floor space and provide a sleek look. Tabletop cases offer flexibility and portability. Freestanding units can be larger and accommodate more cars. Consider whether you want a closed case for maximum protection or an open case for easier access. The style you choose should complement your home décor and meet your specific display needs. Think about the room where the case will be placed and choose a style that blends in nicely. Consider a display case that is both beautiful and practical.
Gathering Your Materials
Once you have your design, it’s time to gather the necessary materials. The quality of your materials will directly impact the durability and aesthetics of your display case. Choose materials that are easy to work with and that complement your overall design. Always take the time to check the quality of your materials before starting the construction to avoid delays and problems later. Select the right materials so that your finished display case is both visually appealing and sturdy.
Essential Tools

You’ll need a range of tools to build your display case. A measuring tape, saw (circular or hand saw), drill, screwdriver, level, and sander are essential. Clamps will be useful for holding pieces together during assembly. Safety glasses and a dust mask are also important. Having the right tools on hand will make the building process much smoother and more efficient. Ensure all tools are in good working order before you start. Check all tools before using, for instance, sharpen the saw, to get the best results and avoid mistakes during construction.
Wood or Acrylic
Wood is a classic choice, offering a natural aesthetic. Pine, oak, or plywood are popular options. Acrylic provides a modern look and is lighter than glass, making it a good alternative. Consider the strength, appearance, and ease of working with each material. Acrylic sheets can offer good transparency, though it scratches easier than glass. Plywood provides a sturdy base, while wood offers a traditional appearance. Assess the pros and cons of each material relative to the type of case you are planning to create.
Glass or Plexiglass
For the display panels, you can choose between glass and plexiglass (acrylic). Glass provides a clear view and is scratch-resistant, but it’s heavier and can be more fragile. Plexiglass is lighter, shatter-resistant, and easier to cut, but it can scratch more easily. Consider your priorities – durability, safety, and ease of handling – when making your decision. Measure carefully and order your panels to the exact dimensions to make the construction process easier and get a professional look.
Step by Step Construction

With your materials and tools ready, it’s time to start building. Follow the steps below for a successful construction. Patience and precision are critical. Double-check all measurements before cutting or assembling. A well-constructed display case will not only protect your cars but also enhance the aesthetic appeal of your collection. Before beginning, review the plans carefully to ensure a smooth building process. These steps provide a detailed, step-by-step guide to constructing your display case, ensuring you create a visually appealing and functional space to showcase your collection.
Cutting the Wood
Use a saw to cut the wood pieces to the dimensions outlined in your plan. Measure twice and cut once to avoid mistakes. Make sure your cuts are straight and clean. Consider using a guide or jig to help maintain accuracy, especially for longer cuts. Careful cutting ensures that the pieces fit together properly during assembly. Always prioritize safety when using saws, and wear safety glasses. Take the time to measure accurately and cut precisely to get professional results, and remember to take breaks to avoid fatigue.
Assembling the Frame
Assemble the frame of your display case using screws, wood glue, or both. Ensure the corners are square and the frame is level. Use clamps to hold the pieces together while the glue dries or while you screw them in. For added strength, consider using corner braces. This step is crucial for the structural integrity of your case. Ensure the frame is square before proceeding to the next steps. Taking the time to create a sturdy frame will ensure your display case will last for years.
Adding Shelves

Install the shelves at the desired intervals. You can use shelf supports, or if you’re using wood shelves, you can attach them directly to the frame with screws or glue. Make sure the shelves are level and evenly spaced. Ensure the shelves can support the weight of your diecast cars. Check the alignment carefully to ensure the overall aesthetic is maintained. Consider adding a lip to the front of the shelves to prevent cars from sliding off. Think about the spacing between shelves to accommodate cars of various heights.
Installing the Glass or Acrylic
Carefully install the glass or acrylic panels. If using a frame with grooves, slide the panels into the grooves. Otherwise, secure the panels with clips or adhesive. Make sure the panels fit snugly and are sealed to prevent dust from entering the case. Handle glass with care, wearing gloves and safety glasses. If using acrylic, avoid harsh cleaners that could scratch the surface. Careful installation will provide a clear view of your collection and protect your cars from dust and damage. Inspect for gaps or imperfections that might compromise the case’s integrity.
Finishing Touches
Once the main construction is complete, it’s time to add the finishing touches. These details can significantly improve the overall appearance and functionality of your display case. Spend time on these finishing touches to enhance the final look of your project. The smallest details can make a big difference in the final appearance and feel of your diecast car display case. Take your time to get it right and enjoy the final outcome.
Painting or Staining

Apply paint or stain to the wood to achieve your desired look. Consider the color scheme of your room and the overall aesthetic you want to create. Apply multiple thin coats rather than one thick coat for a smoother finish. Allow each coat to dry completely before applying the next. Use a primer before painting for better adhesion and durability. Remember to protect the glass or acrylic panels while painting. Painting or staining gives the display case a professional look and enhances its visual appeal.
Adding Lighting
Adding lighting can dramatically enhance the display of your diecast cars. LED strip lights are a popular choice, as they are energy-efficient and easy to install. Place the lights inside the case to illuminate the cars, or use spotlights to highlight individual models. Consider adding a dimmer switch to adjust the lighting to your liking. Ensure the lighting does not produce excessive heat, which could damage your cars. Lighting will make your display case even more attractive. The correct lighting will highlight the details and colors of your diecast cars.
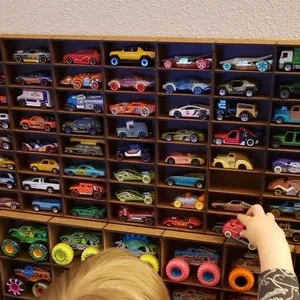
Displaying Your Cars
Now that your display case is complete, it’s time to arrange your diecast cars. Arrange your cars to maximize visual appeal. Consider grouping cars by make, model, or theme. Leave enough space between each car to prevent crowding. Adjust the lighting and shelf heights to highlight your favorite models. Arrange your cars to tell a story or create a visually engaging display. Experiment with different layouts until you find one you love. Your display case is now ready to showcase your collection in an impressive and organized manner. Enjoy the fruits of your labor by displaying your diecast cars proudly.
Building a diecast car display case is a fulfilling project that combines your passion for collecting with your DIY skills. By following these steps, you can create a beautiful and functional showcase for your prized possessions. Enjoy the process, and take pride in displaying your collection in a way that reflects your personal style and love for diecast cars.